Subscribe
Tutorial Index
Photoshop Beauty Retouch for Beginners
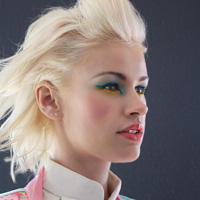 The ‘Beauty Retouch’ is one of the most common processing tasks undertaken in Photoshop, and it’s also a great way to familiarise new users with the software. We’ve looked at Retouch Techniques previously at SurrealPSD, however this version simplifies the approach, using duplicate layers and ‘masks’ to implement the edits. Get the most from your photography or stock resources, read on for the skinny!
Retouch Principles
The best retouch work is subtle, ideally unnoticeable to the casual viewer. With any of these amendments it’s always best to hold back a little as opposed to being heavy handed with the processing.
In this walkthrough we will be removing blemishes, evening out skin tones, brightening eyes / hair / teeth and selectively sharpening features of the face. These simple amendments can really increase the life, vibrancy and appeal of a portrait image, without overwhelming the natural features of the model.
The Retouch
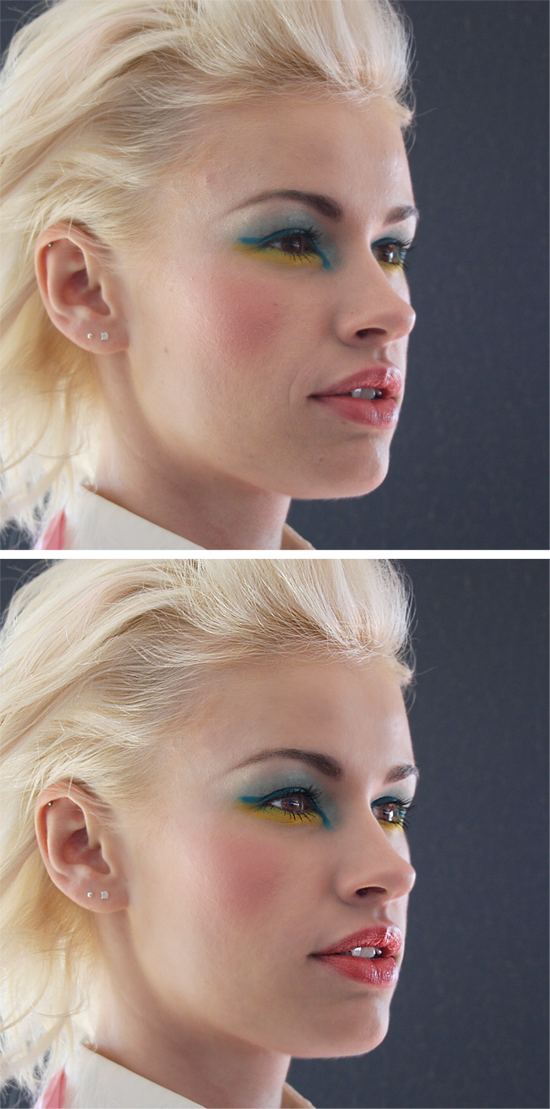
For the example Im using a head shot by CathleenTarawhiti (DeviantArt) which you can get here: [link] (select ‘Download Image’ for best quality!). Here we have a before and after, showing the work to be done:
Step 1: Blemish Removal
Open your selected image in Photoshop. To begin, create a duplicate of your portrait layer (with layer selected, hit Ctrl/Cmd + J) – hide the duplicate layer by clicking the ‘eye’ icon on the layers palette. Keeping a copy of your original allows you to check out the changes youve made as you work.
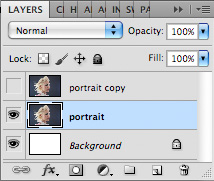
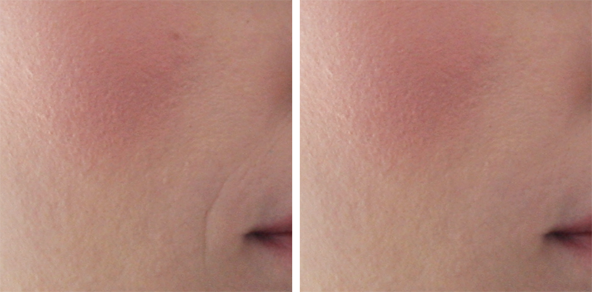
Zoom in using either the magnifier tool (Z) or the shortcut Ctrl/Cmd + so you get a clear view of any surface blemishes on the skin. With the visible ‘portrait’ layer active, select the ‘Spot Healing Brush’ from the tools palette (J). To remove a blemish, simply ‘click’ the healing brush on any spots, moles or scars.
• Holding down the Spacebar allows you to move the workspace with the mouse, very useful in this type of work.
• The brush size should be just a little bit bigger than any blemish that you are removing. Use the square bracket keys to change the brush size quickly [ ].
• Ctrl/Cmd + – are essential shortcuts for zooming in and out.
• You can also remove wrinkles by clicking and dragging the healing brush along wrinkle lines.
Step 2: Skin Surface
In this step we will be evening out the skin surface in a natural manner. Once you are happy with the blemish removal, duplicate the portrait layer (Cmd/Ctrl + J) and rename the duplicate layer ‘skin’ (double click on layer name to edit). Apply a Surface Blur to your ‘skin’ layer (Filter > Blur > Surface Blur) – the values you choose will depend on your stock image, here is the settings used for the example piece:
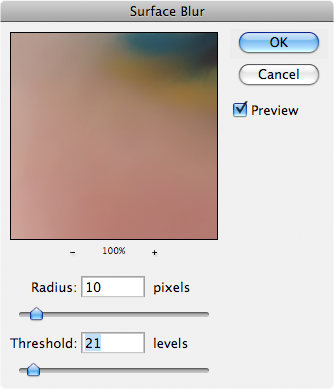
Hit OK to apply the blur. Next we will add some Noise, just to add a little texture and get away from the ‘plastic’ look that can arise. Go Filter > Noise > Add Noise to bring up the dialog. Select a value of ’1′ and apply the Noise filter by hitting OK:
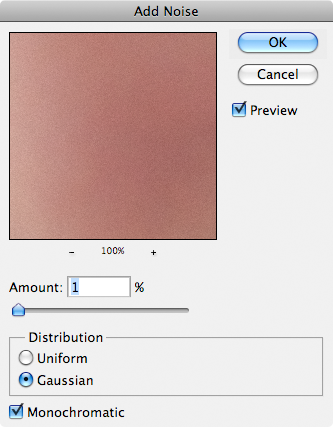
With the skin looking more even, it is time to ‘selectively apply’ the effect only to the areas we want it to appear, to do this we use Layer Masks. Add a Layer Mask to the ‘skin’ layer by selecting the ‘Add Layer Mask’ button at the bottom of the layers palette (grey rectangle icon with white circle). Invert the Layer Mask to black (Image > Adjustments > Invert or the shortcut Ctrl/Cmd + I).
By inverting the Layer Mask, we have completely hidden the skin tone layer; we will now paint in the layer, where we want it to appear. Select a large Soft Edged Brush (B) (set to white colour, hardness 0%) and paint over the large areas of the skin – avoiding the eyes, eyebrows, hair, clothes and mouth.
• Pull the Opacity slider down on this layer to around 30%, so the original skin details show through. That’s the skin done, onto the next part!
• For more info on Layer Masks, check out the following – Core Skills: Photoshop Layer Masks
Step 3: Brighten Eyes and Teeth
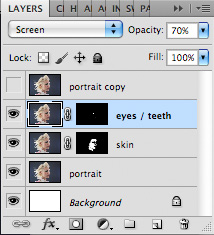
In this sneaky step we will be brightening the eyes and teeth in one action! Select the ‘portrait’ layer at the bottom of the layers palette, and duplicate it (Ctrl/Cmd + J) – rename the duplicate layer ‘eyes / teeth’. Change the layer mode to ‘Screen’ via the dropdown:

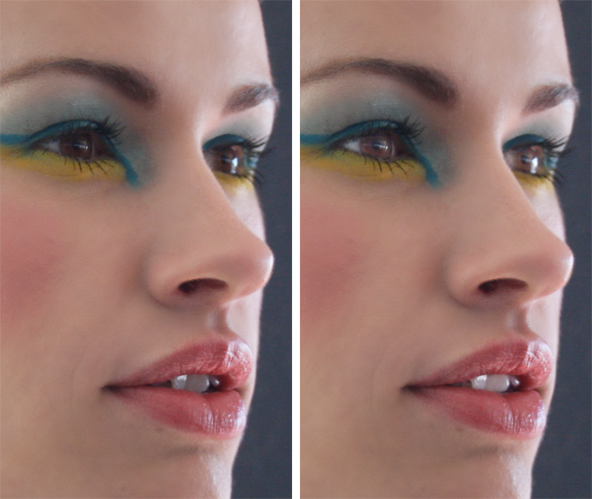
Again, we will use a Layer Mask to apply the effect selectively. Add a Layer Mask to the ‘eyes / teeth’ layer, and Invert to black (Ctrl/Cmd + I) – use a Soft Edged Brush (B) set to white, and paint over the eyes and teeth. Zoom in close and user a smaller width brush for a cleaner job. Reduce the opacity of the ‘eyes / teeth’ layer so the effect is less prominent; the example is set to opacity 70%. Before and after brightening:
Here’s how the layer stack looks so far:
Step 4: Vibrant Colour
Using the same techniques as above, we will add some ‘vibrancy’ to the lips, eyes and eyebrows – to enhance the rich colours:
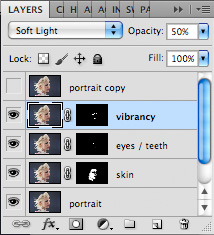
• Duplicate the ‘portrait’ layer, and rename it ‘vibrancy’. Set the ‘vibrancy’ layer mode to ‘Soft Light’ in the layer palette dropdown.
• Add a Layer Mask to the ‘vibrancy’ layer – invert the colour to black (Ctrl/Cmd + I).
• Using a Soft Edged Brush (B) set to white, paint over the mouth, eyes and eyebrows to bring the effect in.
• Change the Opacity of the ‘vibrancy’ layer to 50%.
Step 5: The Sharpen
For this step we will be creating a ‘merged copy’ of everything we have, as opposed to creating a duplicate layer. Select All (Ctrl/Cmd + A) and then Copy Merged (Edit > Copy Merged or shortcut: Shift Ctrl/Cmd + C), and then paste (Edit > Paste or shortcut: Ctrl/Cmd + V). Ensure this new layer is at the top of the layer stack, rename it ‘Sharpen’.
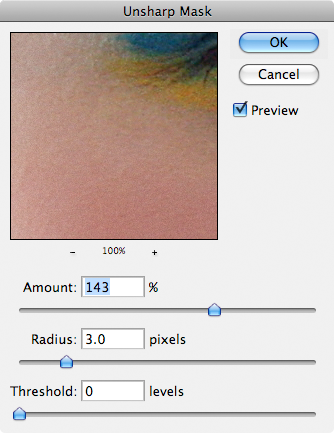
With your ‘sharpen’ layer active, apply the filter Unsharp Mask (Filter > Sharpen > Unsharp Mask). In the dialog pop-up, input the following values:
The sharpening effect only needs to be applied to the hair, eyebrows, eyes and mouth; so as before we use a Layer Mask to selectively apply:
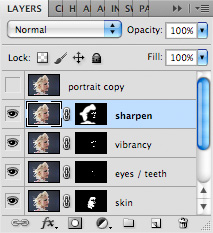
• Add a Layer Mask to the ‘sharpen’ layer – invert the colour to black (Ctrl/Cmd + I).
• Using a Soft Edged Brush (B) set to white, paint over the hair, mouth, eyes and eyebrows to bring the effect in.
• Leave opacity 100% and blend mode ‘Normal’
..And that’s the final step! Heres another look at the before and after, showing the overall progress:

Review
This walkthrough is a great introduction to the versatility of Layer Masks and the selective application of effects. As your Photoshop awareness progresses, investigate using Adjustment Layers to apply processing with more options and finesse. If you have any killer retouching tips, please feel free to share in the comments section below. Happy editing!!
Conzz ![]()
Follow on Twitter >> @Conzpiracy
Thanks for directing me here. I just started working with Photoshop and I need all the help I can get. It’s a pretty amazing program, I can see I’ll be learning it for a long time. Your tutorial was very good it explained everything in understandable steps.
Thanks so much for the comment Ken, Im glad you find the content useful
[...] Photoshop Beauty Retouch for Beginners; [...]
[...] https://www.surrealpsd.com/photoshop-beauty-retouch-for-beginners/ [...]
Thank you so much, I used these skills in my photography class and they put my at the top of the class in skills.
I’m currently using these again to touch up my graduation photos and they look amazing.
Thanks
s not simply an “acne relief” or ” skin-care program”.
The first thing you need to realize is that contrary to what many skin experts believe, the food that you eat has a lot
to do with acne. You can use it for chapped
lips, dry skin, and anything else you would normally use petroleum jelly for.